How to make a bedside table with your own hands?

A large number of ways are used to equip your home. These include making simple furniture with your own hands. It is cheap, which is very practical, and is made from scrap materials, which is very convenient. In most cases, a room equipped in this way has an original look, and the furniture is practical.
For self-production of furniture, pallets are very often used. When disassembled, a large amount of material and strong hardwood is obtained from them. That for homemade products is one of the main conditions.


Drawings and dimensions
Among the household utensils, one of the most demanded is the bedside table. Such products are used from all rooms of the house and have a multipurpose purpose. They can be of different shapes and sizes, which speaks of their versatility. For example, in the kitchen they can be seen in the form of hanging cupboards, and in the bedroom they stand next to the bed, like coasters for nightlights.
Making bedside tables with your own hands will not be difficult, having information on how to do this correctly, as well as the presence of some tool. First you need to have an idea of what shape and size a homemade bedside table should be. To do this, you need to make sketches of the future product on a sheet of paper. Since this is a bedside table, it should be sized to match the height of the bed in the bedroom. Therefore, all initial dimensions will depend on the height of the bed.


For an illustrative example, the actual height of the product can be depicted on a Whatman paper or a piece of wallpaper, which will give a clearer idea. With this visualization method, you can specifically find out what shape the sawing parts will be in the future structure. Drawings and dimensions are determined experimentally based on the dimensions indicated on the paper.
The width and shape of the product is chosen arbitrarily and depends only on the imagination. But it is worth noting that a curbstone with rounded corners or irregular shapes will be more difficult to assemble. Therefore, in most cases, the correct shape is chosen for self-production.


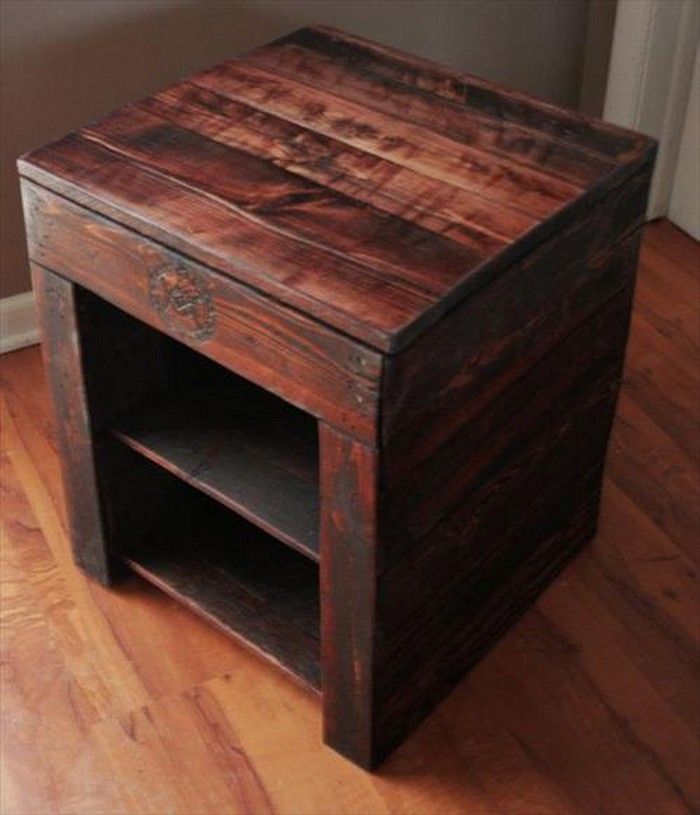
For the bedroom, a small bedside table is most often made. The fact is that it is used more as a stand than for storing things, so the size of the internal shelves is of the last importance.
Making a simple cabinet
When the dimensions and drawings are ready, you can start making the curbstone. But at this stage you need to decide what material it can be built from. Today in hardware stores there is a huge selection of materials for the manufacture of such products, so there should be no hesitation at the selection stage. For such work, the following materials can be used.
- Plywood. It has been used in the furniture industry for a very long time. Almost any piece of furniture can be made of plywood. Sheets are available in various thicknesses.
- Chipboard (particle board). It is used in the manufacture of furniture in closed places, for the use of shelves, back walls, lower pallets of structures.
- Chipboard (laminated chipboard). This type of material is suitable for the facade parts of the structure.
- Wood of different species. Wood is used at various stages in the manufacture of a structure.
Also, the bedside tables for the bedroom can be conditionally divided into options:
- with drawers;
- with shelves without drawers;
- closed type without a door.


If the cabinet project has doors or cabinets, then additional fittings in the form of hinges, locks, handles will be required.
After the material for manufacturing has been determined, it must be cut to the required dimensions. This is done using a circular saw or a hand jigsaw. Parts that have been cut must be cut with an electric or manual jointer.
The next step is to assemble the pedestal box. With the help of self-tapping screws, 4 workpieces are attached, the lower and upper parts to the side ones. Before twisting, the joints should be coated with glue.
Another connection option can be fastening to iron corners, which significantly speeds up the assembly process, but is inferior in strength to the previous version. The connection diagram of the parts must be thought out in advance in the drawing.
The next step is to attach the back wall. This part of the cabinet is usually made of thin plywood or laminated fiberboard, which are attached with the glossy side to the inside of the product. Fastening is done with staples or self-tapping screws 20 mm long.
After the rear wall, the front door is attached. Based on the dimensions, the hinges are installed, and with the help of decorative screws the door is placed in the workplace. Also, it is immediately necessary to install the cabinet handles and support legs.


At the final stage, it is necessary to make the internal shelves. Their number depends on the project. They are made from chipboard. It can also be made from wood, but the time cost will be greater.
How to make from pallets?
Construction pallets are increasingly used in interior design. This can be explained by the fact that it is an affordable source of quality wood. Tables and beds can also be created from scrap materials of this kind, which makes their use very effective.

Preparation
To use pallets as a material for a cabinet, they must be prepared. At the initial stage, you need to find pallets with new wood. The field of use of these devices for the transport of goods is very extensive, so every day and in large volumes they are made from new wood. This allows you to choose new wooden structures.
At the initial stage, it is necessary to clean it from dust or dirt. It is advisable to use dry, moisture-free products for such purposes. If this happened, then the wood must be well dried.
At the next stage, the pallets must be disassembled into boards. This must be done carefully with a nail puller. It must be remembered that the nails in the pallets are ribbed, in the form of a herringbone. They are used so that when the structure is loosening, the pallet does not disintegrate, and the nail does not come out of the hole on its own. When disassembling, safety precautions must be observed, since such nails are very difficult to pull manually by hand. You also need to ensure that there are no dents in the tree.


After disassembly, all defects in the boards must be putty and cleaned with sandpaper.
Step-by-step instruction
To make a curbstone, as in all cases, you must have a drawing and dimensions. The sides, top and bottom are manufactured according to the specified dimensions. This is done as follows.
To do this, you need to cut the boards to a given length. The size of the width of the structure determines their number per wall. For example, if the width of the board is 10 cm, and the width of the wall is 50 cm, then 5 boards of the required length are required to make a shield. Calculations should be made and the required number of boards for all surfaces should be calculated.
Prepared boards will usually have different thicknesses, so they need to be leveled. For such work in modern workshops, an electric thickness gauge is used. But since this device is quite rare at home, you can use a simple jointer. In another version, the slats can be given for thicknessing to a carpentry workshop and get an ideal result for not much money.
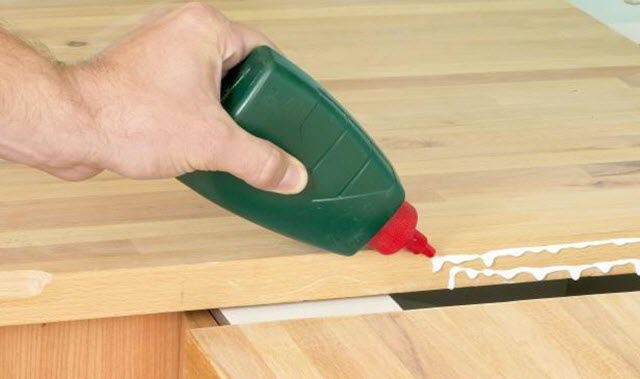
The next step is to glue the shields (sides of the future pedestal). To do this, the required number of boards is laid out on a flat surface on one side edge and the grooves are marked. Their presence in the structure is necessary, since when the temperature drops, the tree tends to deform and dry out. In the given places in the side parts of the board, holes are drilled into which the dowels are inserted.


When all the grooves are made, the walls of the curbstone are assembled on a flat surface, and the joints are coated with carpentry glue. In this sequence, the top and bottom of the future pedestal is made.
After preparing all surfaces, the structure is assembled. At the beginning, the upper and lower parts are attached to the side surfaces. This can be done using self-tapping screws, drilling holes in the side surfaces at specified points, or you can install horizontal shields on strips that are glued to the inside of the side surfaces.
When the whole base is assembled, you need to make the back cover. It is made of fiberboard or thin-layer plywood according to the specified dimensions. The second option is more practical, since plywood processing is less of a hassle.
After the operations done, you need to make and install the front part of the curbstone. It is assembled from the boards in the same way as all the parts. But this version of the facade will be quite troublesome, since you will have to spend a lot of time sanding the wood. Also, this part of the structure can be made of plywood, which will be much faster, and the unusual texture of the wood will also delight the eye.

After cutting the sheet to the required size, the cabinet door must be screwed onto the hinges to the structure. It is important to remember that when open, the cabinet door must be in the same plane with the wall.
To mount the inner drawers, you should purchase the required quantity of ball guides in advance and install them inside the cabinet. Attach the second parts to the box on both sides and insert it along the guides.
If the drawing provided for the legs for the curbstone, then you can buy it ready-made or made from parts of the pallet.
At the end of all work, paint and varnish works are carried out. Particular attention should be paid to the ends of all glued panels. In these places, the varnish must be applied in several passes.


After drying, all other fittings are installed.
Recommendations
To make a quality product, you should not rush too much. Woodworking requires attention and clear markings. When using a hand tool, it must be sharpened with high quality in order to avoid causing unnecessary defects.
Work should be carried out in a well-ventilated area, as inhaling wood dust can lead to poisoning. Also, good ventilation should be provided when working with glue.
Making your own cabinet from wooden pallets, you end up with a product that will have a beautiful appearance and will last a very long time.
Since with proper exploitation, the wood will not have an expiration date.


How to make a bedside table with your own hands, see the video below.


